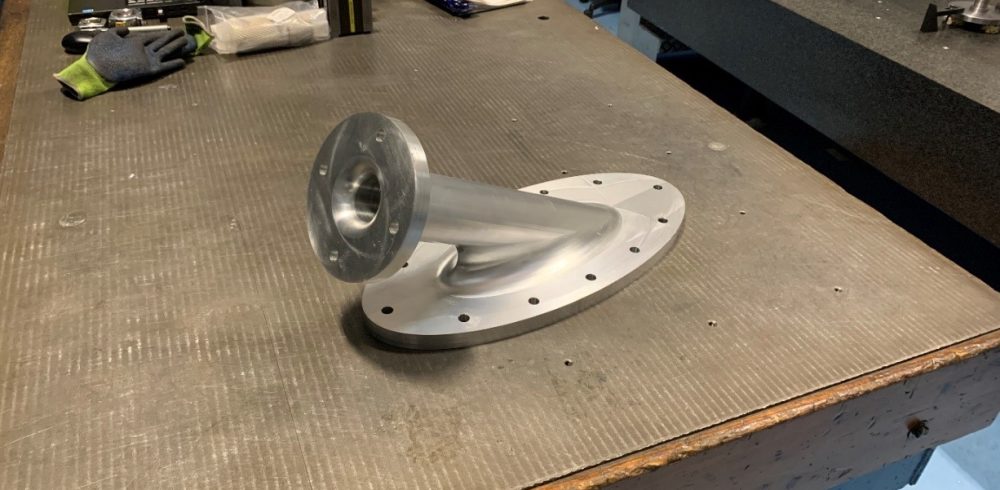
Pryme Group Newcastle received an enquiry for the sub-contract manufacture of a 30˚ flange to flange connection casing penetrator. Historically this type of part would have been sourced as a casting then had the sealing faces machined and drilled. However, a casting could not be procured in a reasonable lead time and was not a viable option due to cost of having a bespoke casting produced. Therefore, the part was required to be manufactured from a solid piece of material.
Pryme Group Newcastle’s Engineering team remodelled the Casing Penetrator from the incomplete casting CAD model and worked closely with the customer to ensure the new CAD model was correct to their requirements and would seal and fit with the mating faces correctly. When this work was complete, the next challenge was to explore work holding methods to ensure the part could be successfully machined to the updated CAD model and customer specifications.
They had to design work holding methods very carefully and plan the machining operations to successfully produce the component to the Geometric tolerances required. The work piece had to be presented to the machine tool to ensure all profiles and facets could be machined. It is worth noting behind the flanges and the external pipe section between the flanges required full 5 axis milling. They conducted a full manufacturing review; it was deemed necessary to machine the component in four operations to ensure all areas were machined correctly and allow for any distortion caused during the removal of excess material.
Operation one did not require any specialist work holding methods. It was simply held in a vice to rough machine the large flange face and machine a series of 6 off M12 holes for clamping to the fixture on operation two. The M12 holes machined in this operation are positioned where the Ø14mm flange face through holes are, and subsequently get opened out to drawing size later in the machining process.
Operation two required a fixture that would present the workpiece 400mm off the machine bed securely to allow access for the machine tool spindle to reach behind the two flanges, so the external pipe section of the component could be generated. The fixture was fabricated and welded by Pryme Group’s welding and fabrication department. The fixture was then finish machined and had all clamping and securing holes added for securing the fixture in the machine and the work piece to it. This fixture is also used again at the final stage of machining to reduce set up times and alleviate the need for a third manufacturing fixture.
Operation three fixture presented the large flange face to the machine tool. To do this a base plate with six columns was fabricated then finish machined. The machining activity on this penultimate operation is to finish the large flange face, open the 6 off M12 holes to Ø14 thru with Ø32 counter bores and then finish machine the internal radii and through bore of the pipe section.
The fourth and final operation involved turning the component back over to complete the last machining process. The work piece was located back on the operation two fixture on 6 off Ø14 dowels for location. The position of the 6 dowels had been precision machined and set as the centralised datum point, so the small flange face could be finish machined precisely to the 30˚ orientation of the large flange face. Due to this careful planning and work holding design the finish machined component was to specification with a quick turnaround time.
Manufacturing & Engineering Magazine | The Home of Manufacturing Industry News


